
Since this was such a great buck, I thought I'd take pictures of the mounting process since I've never taken photos step-by-step of me mounting a deer before. This will show you just how involved taxidermy really is!
First, here's the tanned caped. I prefer a "short" incision, but in this case, the guide cut the cape all the way down the back... no problem, it just means extra sewing for me!

Trying to sew the cape up after putting it on the form always seems to result in lots of hide paste on the cape, and difficulty in getting everything aligned. To avoid this, I turn the cape inside out and go ahead and sew the whole thing up ahead of time, stopping a few inches from where the antlers will go.

Now I prepare the ears. The ears, that were turned before tanning, must have the cartilage removed, as shown in this picture. I then wipe the ears with laquer thinner and dry them off with my master blaster blower (a hair dryer will work too). I try to get them extremely dry, as this will make them adhere to the earliner the best.

Now that the ears and dry and ready to accept an earliner, the liners must be prepared. I use pink Eppely earliners. First I use a [u]stout ruffer[/u] to rough up the plastic on both sides, then I use a red sharpie and draw veins on the inside of the earliner. Finally, I mix up equal parts of Epogrip liquid fast set and spread that all over both sides of the earliner. Just slip the liner inside the ear, adjust everything in place, and within ten minutes .. a beautiful ear, no drumming!

Then I take a log of clay and wrap it around the base of the earliner to form an earbutt. I like to use more than less in this case. Too much can always be worked around, but too little.. and the deer just won't look right.
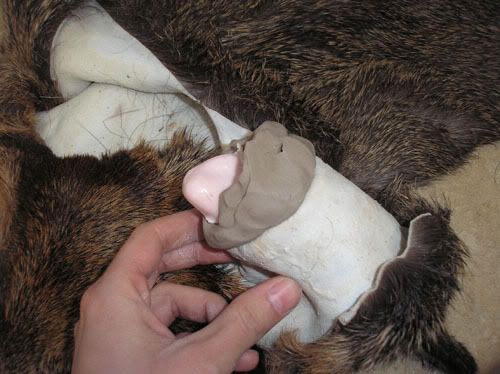
Here is a finished ear + earbutt, in the ears forward position. You will want to sculpt the earbutt differently, depending on how you want the ears positioned.

Ok, now while I'm letting my epoxy in the ears set up, I'm going to work on the form... when I have cut the skull plate on the antlers to the proper angle, I set them on the form and put bondo all around.

Once the bondo has set up, I simply pop them off the form and I have a nice set of antlers ready to put right back on the form.

Now I'm using the stout ruffer again, to rough up all areas of the form so the hide paste will adhere properly

I hollow out an area on both sides of the head to allow the ear canal to set in. This keeps you from getting a bat-eared look!! (I do this on all my small mammals too.. it works especially well for them)

The nostril cavity is hollowed out using a dremel and small files to get the right shape. Then a speed septum is installed.

The form is ready!

Now here I am rubbing hidepaste on the form, everywhere except for the head. I use a dextrine based hidepaste on the back, and areas not susceptible to drumming. Everywhere else gets Buckeye supreme.

Ta-da!

Now I start to carefully pull the cape over the form, avoiding getting hide paste on the hair (although it's not a big deal if it does get on there, since it is waterbased paste that will wash off easily)

Doesn't it look like a world champion winner about now!?! haha..

Now I insert the eyes and sculpt around them with critter clay ... one sculpted, one not

Side view

I continue claying all the way up around the antlers

Finally I apply hidepaste on the face and lift the face of the cape into place

Now all that's left to do is tucking and adjusting. I'll tuck the notrils and push them full of saran wrap (leave it in for a day or so), and tuck the lips with my tucking tool, as shown in this photo

I use a smaller tucking tool to tuck the eyes...

Then all that's left to do is sew up the incision! I use 4 lb. test Fireline.

Then I let the deer dry!
I should have taken photos during the finish work, but I didn't. After three weeks of drying, finish work was done with a Paasche H airbrush and lifetone laquers.
Since this was a wall pedestal, I finished the scooped out part with "naughide" .. it's an artificial leather, but looks like the real thing!

Here's some finished photos


