Wow, it's been nearly a month since I last wrote! I know many of you check this journal often for updates, so I am sorry for taking so long. With the season in full swing, and the holidays, I have gotten so busy that updating this website often gets forgotten. But I will make up for it by filling you in on everything that has happened in the past month...Get ready for a LONG entry!
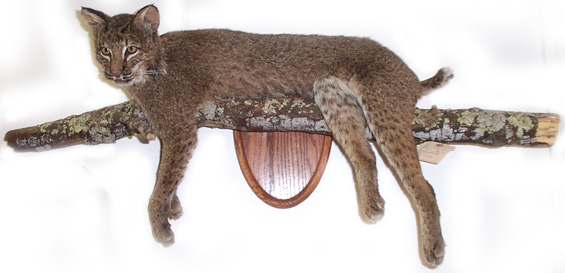
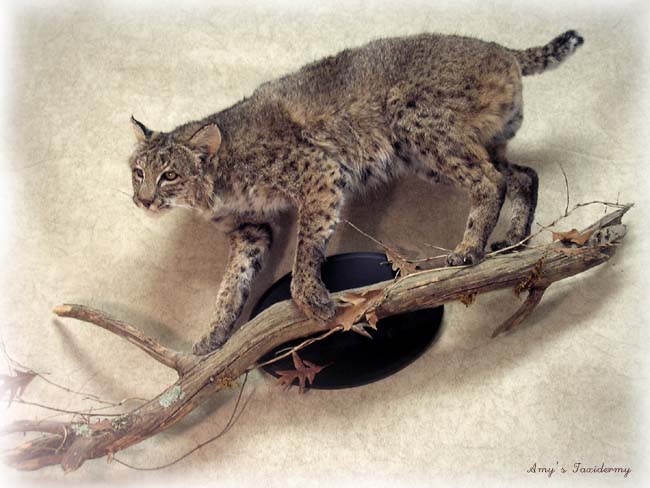
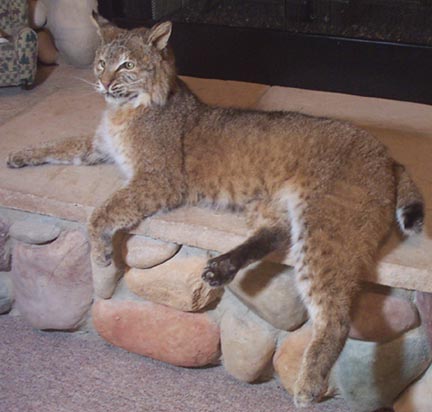
First of all, I finished the bobcat lying on a limb, for my friend Mike. Yes - I got it done in one month! I don't normally get things done nearly that quickly for customers.. but that's the benefit of being a close friend with me!
Anyway, here are some pictures of it. I think it turned out just awesome! The eyes look even better than the last cat that I did. I will only use the Tohickon IQ eyes in bobcats (rather expensive) but I think it makes a world of difference.
The limb is attached with threaded rods to a solid oak panel, making the limb stick out from the wall about 5". I put alot of work into this, but it sure turned out nice...
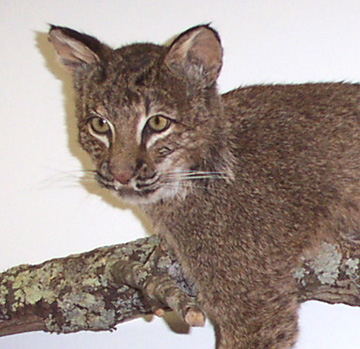
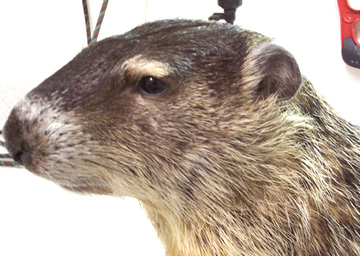
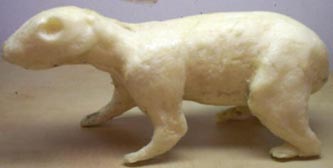
On the topic of bobcats, I got another bobcat from a customer about a week ago. That makes three bobcats I've got to do for customers! It must be a good year for bobcats. This one is by far the biggest and most spotted of the three I've gotten in; in fact, I don't believe they get much bigger than this. Here's a picture of it.. see the nice spots on the back legs?

The customer hasn't quite decided how he wants it done. I'm hoping he'll want a full mount done, as I would love to mount a lifesize cat as impressive as this one. He may opt for a pedestal mount, though, and have the back hide tanned.. we'll just have to see.
I also mounted a grey fox (for myself) a few nights ago. This was the first lifesize fox I've done. Upon closer inspection of the fox while skinning, I found that it's right eye was scraped a bit (no doubt from when it got hit by the car). That caused a bit of a problem when trying to get the eyes to look right, but in the end it turned out ok. A little painting and hair transplanting and I should be able to get it to look normal.
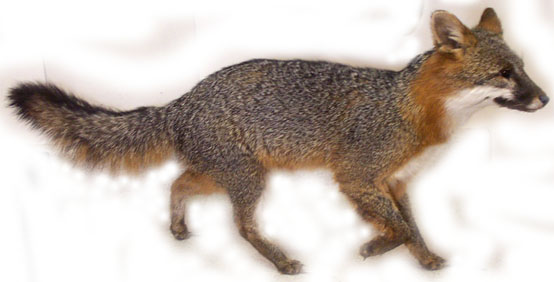
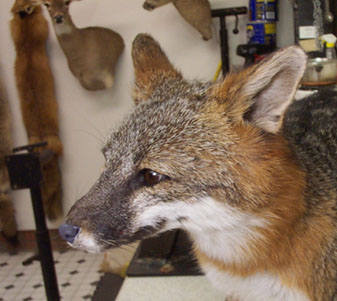
In case you're wondering why the nose looks odd, that's because it's artificial and hasn't been painted yet. Once I get it painted and glossed it will be hard to tell from the real thing.
That fox was given to me by Mike, and he gave me another grey fox the other night! Both were roadkills.. there must be alot of grey fox in his area! Since I've already mounted one for myself now, and don't really need another mount, I am going to do this one as a rug! I'll do it open mouth, and have felt around the edges. It's in the Krowtann right now, but after it's done tanning I'll begin work on the rug.
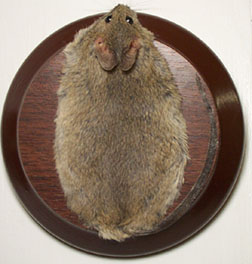
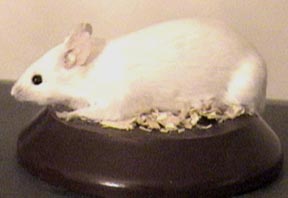
Let's see... what else.. ah, here's something you don't see very often. In fact, it very well could be the only thing like it in the world. This is a mouse rug on a plaque.. an online customer requested this. It sure is unusual, but I think it's kinda cute.
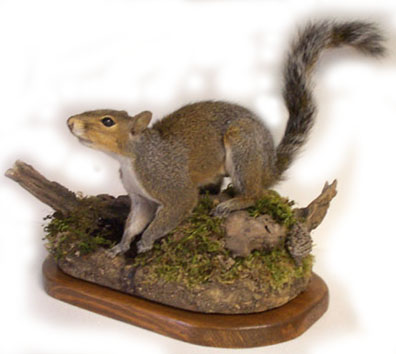
And here is a squirrel I recently completed. I was going to do it for Ebay, but this one turned out so nicely that I decided to keep it for myself. I made the habitat base myself. You can't tell in the picture, but there is a small puddle of artificial water. I also made the wooden base -- cut it out of pine, sanded, and stained it.
I am happy with all the customer work I have gotten in this year. So far, right now I've got this stuff to work on for customers..
2 Bobcats
1 red fox (pedestal)
1 coyote (pedestal)
4 Deer
1 Cottontail rabbit
And of course, I will be supplementing my income with the usual squirrels, rats, and mice sold on Ebay.
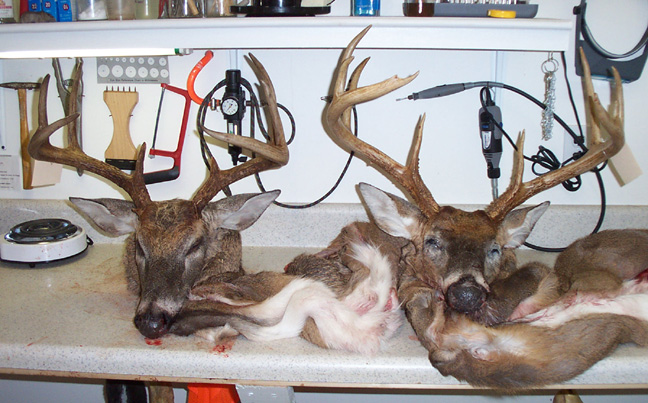
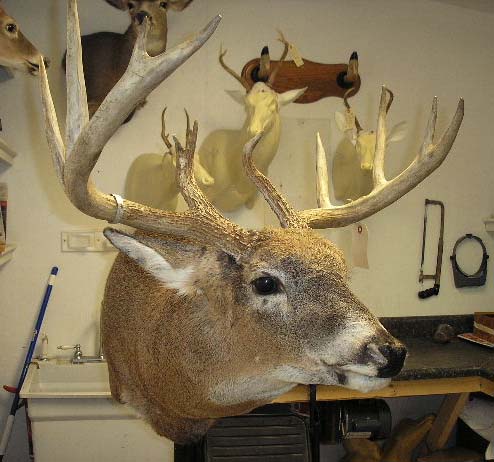
The four deer I have taken in so far have all been really awesome deer. Here are the racks..
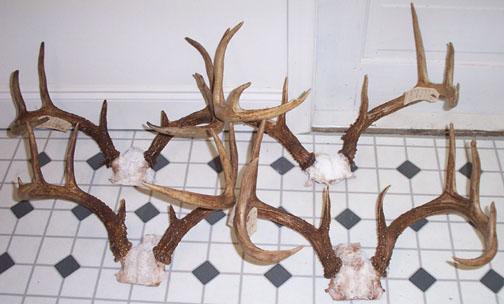
The two on the right are particularly nice. The one on the top was shot nearby, but the one on the bottom came all the way from New York! Once I get the head mounted I will have to crate it and ship it back.
As a final note, I thought I would post a picture of some fine pelts I just bought... a huge coyote and a beautiful cherry red fox!
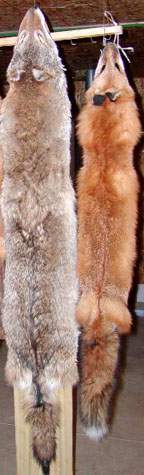
These are skinned to be used as wallhangers or rugs (no feet). They are dried right now but my intentions are (or were) to tan them and offer them for resale in my shop. They look so nice hanging on my wall, though, that I may just be tempted to keep them for myself! I have also bought some other dried pelts that I am going to tan and sell. 2 raccoon, 2 skunks, 4 opossum, and 4 muskrats.
Now THAT was quite an entry, wasn't it? I will try to update more often from now on. I hope everyone has a Merry Christmas!
11.23.03
This week has been just great, as far as customers go! I have taken in another bobcat, a red fox, two deer heads, and a coyote! Look here..
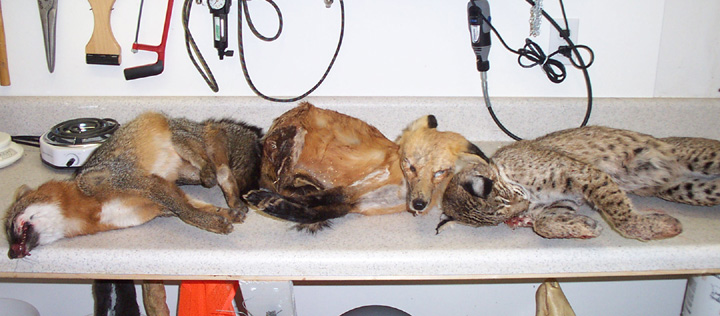
Those sure are a bunch of nice looking frozen animals! The grey fox on the left is for me - My friend Mike found it as a roadkill and gave it to me (Thank you, Mike!). Except for one broken leg, it has no damage. The fur is nice and thick and it'll make a great mount!
Here's the deer heads I took in yesterday, both from the same hunter! As you can see, he's one lucky guy.. both of these are great deer, especially the 10-pointer on the right! They are both going to be mounted in an aggressive, head down position.
The coyote was brought to me last night and it is going to be done as a pedestal, with a rock base like I used on my red fox pedestal. It will also have the tail tanned and wrapped around the base of the pedestal!
All of the small mammals were skinned and fleshed and are now tanning in Krowtann.. that is absolutely the greatest thing I have ever tried! It cuts my tanning work down to almost nothing, yet it produces a very nice, stretchy tan and I haven't had any slippage problems at all. It actually seems to tighten up the hair an iffy skin. I still use EZTan for my deer capes and larger animals, due to the lower price, but Krowtann will be the thing I use on all my small animals from now on!
11.18.03
Look what I just mounted... A bobcat!
It'll look alot better once I get the finish work done (like painting the nose), but atleast you get the idea. I think this cat turned out quite well, especially the expression in the eyes. I worked a long time to get it just right, and I feel that my efforts were rewarded.
This bobcat is for my personal collection, but I'm getting ready to do a customer bobcat, too. My friend, Mike Maynor, shot a very nice cat and brought it to me to be mounted. It's going to be lying on a limb, which will hang on the wall. I'll post pictures of it when it's finished!
11.07.03
Here is a porcupine that I mounted a few nights ago!
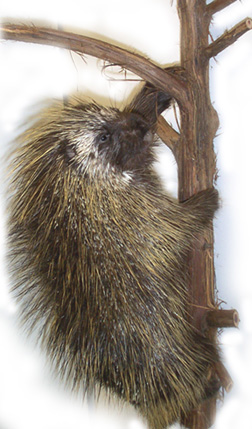
That was such a prickly job -- Tanning it was hard, and mounting it was even worse! But the finished mount is so unique and beautiful, it was worth it. I only wish I could keep it for myself, but it's for a customer. Oh well, atleast I can keep a picture of it!
11.03.03
Here is a picture of my mouse, as seen in the new Fall issue of "Breakthrough" magazine!
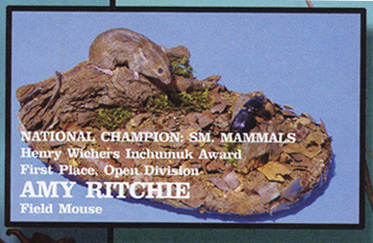
Thanks goes to my friend, John Creager, for scanning that for me. I've always dreamed of having a picture of one of my mounts in Breakthrough, and there it is!
10.31.03
Squirrel season just started, and look what I got already!

I went out hunting and was really happy to get not one, but TWO squirrels! These are nice looking squirrels and will make some fine mounts.. and some good stew, too! My mom thinks the fact that I like eating squirrels is yucky, but I'm telling you.. they really ARE good, especially if you cook them right, with some good spices.
It's been a long nine months waiting for squirrel season to come around again, and now I'm so ready! There's nothing quite like the feeling of standing in the quiet woods and suddenly hearing the sound of a squirrel walking around in the crunchy leaves.. quietly, breathlessly, you stalk it until you're within shooting range. Raise the rifle and line up the crosshairs.. KA-BAM! .. the squirrel flips into the air and lands in the leaves... an instant kill; a perfect shot. As I said, there's nothing quite like it!
I just mounted my biggest deer ever! Take a look:
This big guy had a 23" neck!
My interview can now be viewed online!! It was shown on yesterday's CBS Early Morning News, and they now have it available for viewing on the CBS website!
Click here to go to the page. I am not sure how long they will keep the video, so watch it while you can!
[Update: I believe the video has been taken off the page, but I am working on uploading the video file to my website for future viewing. I will post the new link when I get the file uploaded]
10.06.03
Here's a picture of the huge python skin!

10.05.03
Recently I've been working on two large python skins, given to me by Chris Barnhardt, a local taxidermist. They are burmese pythons; one 12' and one 14'. I will be tanning them both for wallhangers! I am keeping the 14' for myself, and might sell the other one after it is tanned. If anyone is interested in it, let me know. Thank goodness I have a flesher -- snakes don't have too much flesh on the skins, but when you multiply it by fourteen feet, they do!
My interview on the Thursday news was great! If I can figure out how to have the video clip put online, I will. I didn't think it would go any further than the local news, but a friend of mine in Michigan just informed me that it was aired on her local CBS channel! Now I wonder how many other places it may be shown...
10.02.03
I just thought I'd mention that, if you live in Charlotte or surrounding areas and can get Channel 3 (WBTV), I'm going to be on there tonight! The reporters came out to my shop a week ago and interviewed me, and it will be aired on the 11 PM news tonight!
09.26.03
Here are two new mounts that I just did!
A mule deer...

I mounted him on a McKenzie wall pedestal. I was amazed at how big the ears were!!
I also mounted a groundhog!

09.20.03
I finally moved into my new shop!!! It is SO great... lots more space and room to work. I will get some better pictures of it soon, but for now, here's a few shots of it:
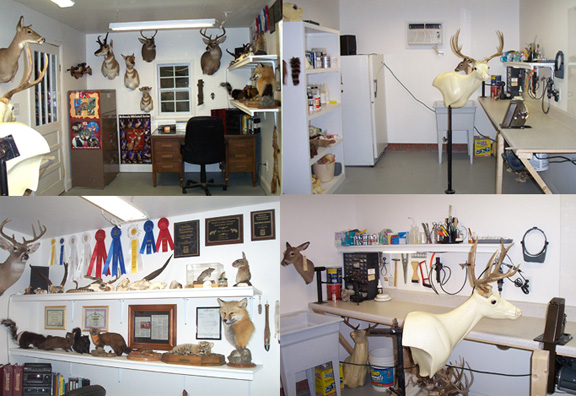
You can also go to the shop page to view larger pictures.
I have most of my mounts, and my ribbons and awards on one end. The other end is the work area. I've even got my freezer in there now.. that will be much more convenient!
09.09.03
Recently I've been experimenting with sculpting, molding, and casting my own body forms! This is much like carcass casting, except for I'm making a mold of a sculpture, not a carcass.
For this first try, I sculpted a grey squirrel (what else??) out of plasteline oil clay. For the head, I sculpted over the actual skull, and inside the body was simply a foam block. When I was finished, it looked like this...
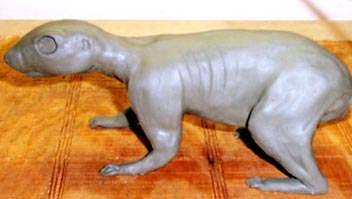
Looking good! After I finished sculpting, I began molding the sculpture. I used bondo, thinned halfway with fiberglass resin to make it pourable. Once the pieces hardened, I reinforced them with a bondo/fiberglass chop mixture on the outside. What made this so different from my previous casting projects was that it was a 3-piece mold rather than just two. It would be impossible to cast a walking squirrel form in a two piece mold. So I made three pieces... one for each side, and another smaller piece that made up the underside and half of each leg. Here's the mold:
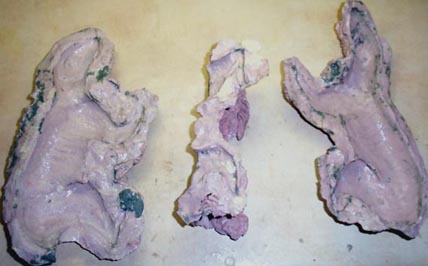
After the mold was finished, I greased the inside heavily with vaseline to keep the casting from sticking. Then I put the pieces together, wrapped some tape around it a few times to keep them together, and mixed up my urethane foam. While it was still in the pourable stage (which only lasts 30 seconds or so!) I poured it in through a small hole I had drilled in the side of the mold. After a few minutes it had expanded.. I let it harden up for about 15 minutes, and then took the mold pieces off. And would you look at that!
A real, bona fide Amy Ritchie squirrel mannikin. Except for a little roughness of the foam, it looks amazingly similar to commercial forms that you buy. Once I perfect molding and casting, I may start to make my own squirrel forms rather than buy them. After all, once the mold is done (the hard part), it's easy to produce multiple forms!
09.05.03
My newest mount...

A striped skunk! This was a very smelly job! When I recieved the raw skin, it had a very strong odor to it. After taking it up to my shop, the smell spread throughout the entire house. Of course, mom was not happy about this! I'm just glad I was able to mount it after all, because the skin was starting to slip on the tail, feet, and belly area. I had to mount it very carefully, without pulling on the hair. But now the skin is drying, and the hair has tightened up. I tanned the skin using Liquatan! That's the first time I've ever used it, but it seems to work very nicely.
Yesterday I got a very unusual specimen -- an armadillo!! That has to be one of the wierdest animals I have ever seen. It took me over three hours to skin it and flesh it! The tail was the trickiest part.. There is no way to clean out the meat but to take the whole thing apart. I had to take apart each section (about 12 pieces), clean out the meat and bone inside, and glue them back together!
Here are some pictures George sent me that I've been meaning to post sooner.. these are some of the mounts that we worked on when he came to visit...

Here's a spike deer head we mounted.. George's first deer. Whoever caped the deer cut the skin REALLY short, but it was good for practice.
This is one of my favorites that we did; an albino mouse that we named "Senor Gonzalez". He was so cute, it was hard to kill him!
George is coming back in February, and we're already planning all the things we're going to mount! One of those is going to be my lifesize bushbuck! That would be such a big job for me, so we're going to work on it together.
09.03.03
Look what I mounted last night! A pine marten...
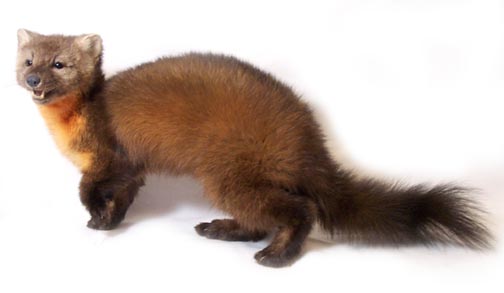
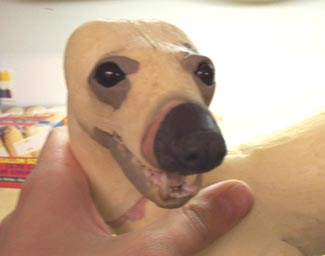
This is an absolutely beautiful animal -- just look at the orange throat fur! I made my own jawset for it, using the actual teeth, but not the entire skull. I hate cleaning skulls and rebuilding them with clay just so I can make my own jawset, so I found a new way to do it! This picture will better help to you understand:
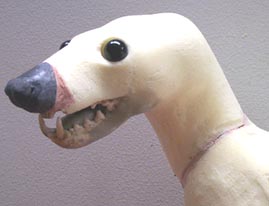
I cut the lower jaw and upper part of the mouth out of the skull, cleaned them, and put them into place on the form. I sculpted the tongue out of apoxie sculpt. As you can see, I've installed an artificial nose as well.
Here's a few behind the scenes photos...
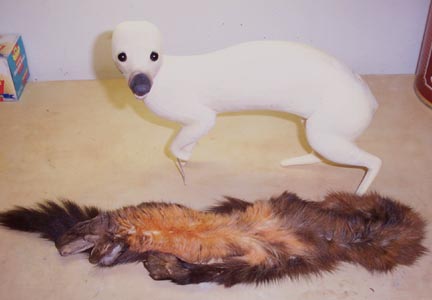
Here's the form and the hide ready to go! A few hours of work and we'll have this piece of skin and foam turned into a great looking mount.
The eyes have been clayed in this picture
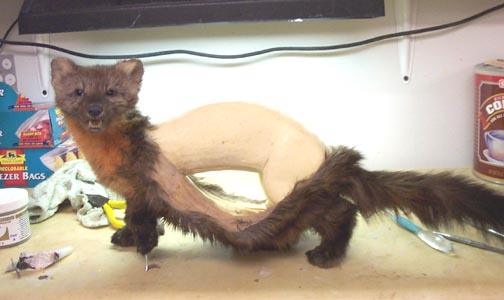
Here you can see the face, legs, and tail have been mounted.. all that's needed now is to put hidepaste on the body and close up the incision!
I have found, one of the main tricks to producing a beautiful piece is grooming. Do not underestimate the power of it! After I finished mounting last night, the marten looked ok, but it just didn't have that fluffy, "alive" look. That's because it's fur was all slicked down. But after blowing it with the air compressor and combing it a little (well, alot) it looks great!
08.25.03
I just got through spending the weekend with my "internet friend" George Garay! George is a 15 year old taxidermist! His mom brought him, along with his brother Dennis and cousin Henry, all the way down from New Jersey just so we could do some taxidermy together!
It was a very fun weekend we had... On Friday, we went to the McKenzie supply house in Granite Quarry, NC. That's only about an hour away from me. Mike Gillis was extremely kind to take us on a very thorough tour of the place. It was so interesting! We got to see how the forms and supplies are made and shipped, and we each got a McKenzie T-shirt too! I would also like to extend a great big "Thank you!!" to everyone at McKenzie supply for the wonderful framed newspaper article they had made for me. It will look fantastic hanging in my new shop!!
Later on Friday, I helped George mount his very first deer head. We also mounted a pair of albino rats; one for each of us.
We spent Saturday at Carowinds! That was very fun.. by the end of the day we were SO tired... But we were ready to "taxi some derma" Sunday morning!! We began by altering an RC-5 raccoon form. We altered three of the legs, the neck, and the middle of the raccoon, thus turning it into a climbing raccoon form. We also mounted a pair of white mice. George wanted to see how I mounted the mouse for the NTA, so I showed him the way I fill mice with critter clay.. only, I used white clay this time.
Well, needless to say, we had a blast. I just wish we had had more time! I'm going to put some more pictures on later, but here's a few for now..
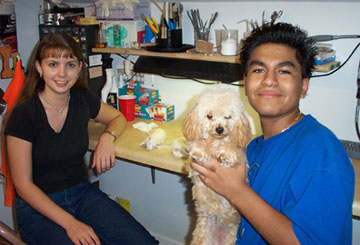
Here's George and I in the shop, working on our rats. We also mounted a teacup poodle! Haha, just kidding.. that's my dog, Miss Prissy!
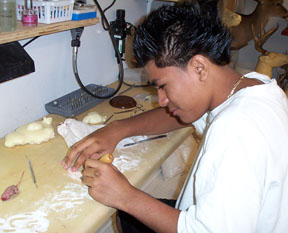
Here's George fleshing his mouse pelt..
This poor mouse almost didn't get mounted, thanks to Henry... LOL